Node:Specific examples of useful pre-signal setups, Previous:Automatic pre-signal blocks, Up:Pre-signals (detailed)
(sometimes called "roro" or roll on/roll off station)
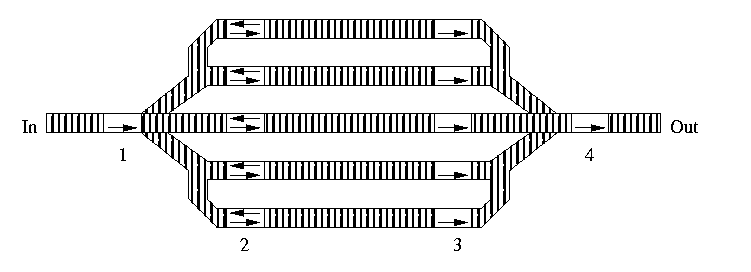
Such a station should be built like this:
There are four sets of signals involved, labelled 1 to 4. Signal 1 is the pre-signal, and only go green if any of the exit signals 2 are green. Signals 3 are those letting the trains out of the station. Finally, signal 4 terminates the exit block.
The following conditions have to be met for this to qualify for automatic conversion. Note that if you convert it manually, it will work like you might expect.
Also, even though not shown in the figure,
If conditions two and three are only met for part of the signals, it will work neither as it should, nor as it did before pre-signals. Those signals will not be converted to exits, so the pre-signal will not consider them when deciding to go green.
To repair a signal stuck at red, you'll have to modify its pre-signal setup with the Ctrl key, or remove and replace it.

This very compact layout of a station is often useful in a city, where there is not enough space for a full roro station. Here, the same conditions apply as in the previous case, and there can also be more than one of signals 1 and 3.
You can even combine both types of stations, i.e. have some of the platforms go through and others end.
These improved overflow loops are useful at the entrance of a busy station, where you need to prevent traffic backup into the main line.
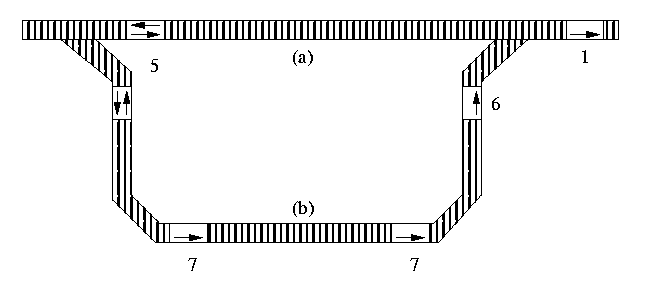
Here, (a) is the usual way to the station, and it's used if there's no train waiting. Make sure that your longest train will fit entirely on (a) to make this work. If there is already a train waiting, other trains will take route (b) and line up at signal 6. You can make (b) as long as you like. It should have a few one-way signals 7 along the way to allow several trains to line up.
A few important points:
This has a few advantages over a regular overflow loop. First, the trains only have to use it once before lining up at signal 6 and don't continue to loop until a platform is available. Also, even if the station is full, at least one more train will not have to use it, only if two or more trains are waiting will it be used. Third, one of the waiting trains will enter the station as soon as a platform is free, without having to complete a loop because it already is waiting at the station entrance. And lastly, the trains will be served in the order that they arrive in. In an overflow loop, there is no guarantee that a train will not loop indefinitely at a very busy station, just because newly arriving trains steal into the platforms.
Many aspects of pre-signalling can be
confusing to those new to it. To help with the understanding,
I have created a demonstration with a small savegame that you can
download.
Please make sure that it won't
overwrite one of your savegames. The save file is trt56.sv1, so if you
already have that file, make a copy of it. It features both a through
station and a terminus station, and has two improved overflow loops.
I encourage you to test this savegame with the pre-signal switch disabled, too, so you can see the difference it makes, and try different numbers of trains (as low as 7 maybe) by sending them to the depot, and more or fewer platforms at both stations.